Introduction:
While, to some, the V1 is simply a point and shoot with interchangeable lenses, I had the feeling from day 1 that the "Nikon 1" system represented a new breed of camera, one that could be an ideal complement to DSLR's in a much more portable form factor. Most of the press and blogs have focussed on the point and shoot limitations:
Small, 10Mpixel sensor - way too small for high ISO work and not enough resolution for reasonable sized printing or any amount of cropping.
Too many point and shoot features that get in the way of "proper" shooting, combined with a button/dial layout that tends to accidentally get changed.
Slow response in some functions - on/off, recover from "standby", switching from the LCD to EFV, etc.
Silly little flash with no support for Nikon CLS
No "interesting" features like auto-bracketing, auto ISO with minimum shutter speed, etc.
On the other hand, the things that got my attention as a DSLR backup are:
Fast AF for a small camera
RAW support that allowed for camera calibration
10Mpixels actually can yield very good 8" X 10" prints, even with some cropping (see my comparison with the D700 here). In fact, it was this work that convinced me that 10Mpix is probably enough for most work and that race for more megapixels is a bit silly.
Very important - Nikon F-mount adapter - FT-1, that allows use of Nikon F-mount lenses with full auto focus, exposure control etc.
Internal flash can control the Nikon speedlights in SU-4 mode, albeit in manual mode
Support of a hardware interface that, today, is used for flash and GPS but holds the promise of additional functions, including CLS
Same battery as the D7000 (and up-coming D800)
Interesting selection of basic lenses that are very small and compact (due to the choice of small sensor size)
Super-fast continuous rate - up to 60fps
Totally silent electronic shutter
Pretty decent (reported) high ISO performance
Using the V1 with long telephoto lenses.
One of the potentially attractive (unique) features of the V1 is that, using the FT-1 adapter, the camera can shoot with any of the modern Nikon lenses with full autofocus, image stabalization and exposure control. Since the image magnification factor of the V1 is 2.7X that of a full frame camera, using even modest telephotos can yield a camera that is lightweight yet with massive focal lengths. For example, the 70-200mm f/2.8 VRII lens yields an equivalent focal length range of 189mm - 540mm. With the 2X teleconverter, this gives a focal length of 378-1080mm! All can be easilly carried around and shot handheld. Coupled with fast AF and blistering continuous shutter (10fps) that can be set to be completely silent, the combination looks very attractive. So what are the limitations? Here are a few:
1. Autofocus only works with Single focus using the center focus point. So you need to nail it on the first go.
2. There's no focus tracking so it's mainly useful for static objects
3. The EVF is low resolution and it can be slow to activate when you want to take a picture quickly
4. At long focal lengths, AF can be slow or, sometimes, not even capture, especially in low light. This is also frustrating when you want to take a shot quickly but can't get the AF to lock on. I found it helpful to set the 70-200mm to "infinity - 5m" to improve lock-on.
5. There's no way to set the "minimum exposure" in auto-ISO mode which makes it useless for stopping motion (in that mode).
6. The V1 is a bit noisy at ISO-400 and above
7. 10Mpixels is a bit low. However, since the magnification is so much greater, you would assume less cropping would be required. It doesn't take much cropping to dramaticaly reduce the resolution of even the most modern sensors. For example, the NEX-7 has 6000pixels (H), the V1 has 3872pixels. This corresponds to a crop of only 35% (the V1 image is slightly less than 2/3 the size of a NEX-7 image in each direction.
8. Because many of the settings are embedded in the menus, it can sometimes take a while to figure out where to find settings. Again, if you're in a hurry, you can lose the shot fussing around with the menus.
9. While hand-holding a camera capable of over 1000mm, it is very easy to spoil the shot with the slightest motion, even at high shutter speeds. I think these magnifications reqire a tripod or monopod for best results.
Despite all these issues, it is still possible to get some nice shots:


Nikon V1, 70-200mm VRII@200mm, 1/1000sec@f/8.0, ISO 400, TC-20EII Teleconverter - focal length (equiv) 1080mm. Handheld.
Imported to Lightroom4, set WB to "Daylight", sharpened w/ Diglloyd settings. No other adjustments, no cropping.
This was the best of about 6 shots. All were focussed OK but the issue was, at such a long focal length, it was difficult to frame the shot accurately. The slightest movement resulted in big shifts in framing. Also, it took a few seconds for the VR to settle down so I'm not sure how effective it was in this circumstance.
These Sandpipers don't like you to get too close. About 30feet is the limit and then they shy off. Also, you need to approach slowly and don't make any sudden movements. Notice that he is keeping a close eye on me. As I move around he will rotate to keep aligned. So, 1000mm is what it takes to get a full frame shot. Anything less will need some cropping to fill the frame. Or else you get lucky and find a dosy, relaxed bird.
Experiment.
While the V1 does a fine job of capturing distant objects using existing Nikon long telephoto lenses, the question is can other, higher resolution, cameras capture the same detail by cropping the image to the same size as the V1? For example, the new D800 has a reolution of 36Mpix - roughly 3.5X that of the V1. On the surface it would seem you could do a lot of cropping and yet retain plenty of resolution. So I set out to try to answer this question.
First, some assumptions.
1. When photographing wildlife, birds for example, they tend to not like it when you get too close. For shorebirds, this tends to be around 25feet. Closer than that and they run or fly off. So, whatever the camera or lens, you aren't getting much closer.
2. With the assumption that dmin is 25ft, I set up a tripod and target subject (cuddly racoon) 25ft apart. When I mounted the V1 +70 - 200mm on the tripod, the target approximately filled the frame.
3. With the V1, D700, D7000, I kept the distance the same and shot the target with each of these cameras. The zoom factor, exposure etc. were the same for all cameras. As expected, the images captured by the other cameras had a much less magnification factor and would need cropping to achieve the same image coverage as the V1. The argument is that any lens I can use on a D800 I can also use on a V1, albeit with the limitations mentioned above. Thus the only way to find a true comparison between an image that fills the frame of a V1 and the same image, shot from a different camera, is to keep the lens/distance combination the same.
4. Interestingly, the DOF on the V1 was shallower than the other cameras. We're tought that the FX cameras have a shallower DOF than smaller sensor cameras. When "dmin" is held constant, we see the opposite effect.
Below are the dimensions and resolutions of various images sensors, approximately to scale. Each camera, not only has different pixel counts but also different pixel dimensions (except the D7000 and the D800 are similar in pixel dimension). Thus, the pink areas represent the equivalent area to the V1 that covers each of these image sensors.


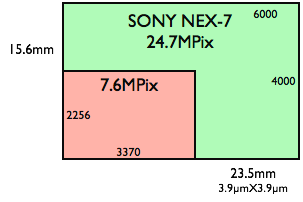
This data is very interesting and illustrates the impact of the multiplication factor of a small sensor. The most startling difference is between the V1 and the D700. An equvalent D700 crop that covers the same area as the V1 would result in a 1.63Mpix image. Even the D800 (and the D7000) only produce a 5Mpix image. The closest that any camera comes to the V1 is the SONY NEX-7 which covers the same image area as the V1 with a 7.6Mpix image. I am not yet able to test this since I don't yet have a 200mm lens for the SONY camera, but Im guessing that for an 8X10 print, these images will be very similar.
The next step was to "normalize" the images and compare them to each other. My "benchmark" was an 8X10 print - if I could not tell any difference between the cameras then the benefit of the V1 was diminished. The normalization process was as follows:
1. Sharpen all images, from all cameras, in Lightroom using the Diglloyd settings, no noise reduction
2. For the V1, export to CS5, crop to 8X10 and resize image to 360dpi, save back to Lightroom as a tiff
3. For the other cameras, export to Perfect Re-size (genuine fractals). Crop to the pixel dimensions shown above to create an equal image coverage to the V1(for example, 1553X1048 for the D700). Then re-size the image to 8X10 @ 360dpi. No additional sharpening. Save back to Lightroom as PSD.
4. Print each image from lightroom on the Epson 3880, 8X10, 360dpi, premium luster paper.
Note. I also tried re-sizing in CS5 as well as printing directly from Lightroom after cropping. All gave similar results to Perfect Re-size.
The results, shown below, illustrate very clearly that the V1 gives superior quality in all cases. Enough to convince me of value of this small sensor camera in shooting distant (and small) subjects.

Nikon V1 1/800, f/8.0, ISO 200. Resampled to 8X10X360dpi and cropped

Nikon D700 1/800, f/8.0, ISO 200. Cropped to same area as th V1. Resampled to 8X10X360dpi, then cropped

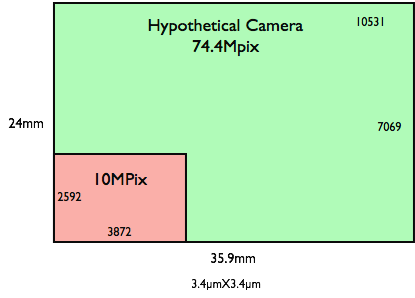
Out of interest, here's the "hypothetical" sensor size required to allow for the V1 crop on a full-frame camera:
Update December, 16 2012.
Nikon 1 V2
I just received the new V2 and wanted to see if there were any added benefits to using this class of camera for long telephoto shooting. On the surface, the V2 has a number of spec improvements:
1. 14Mpix (versus 10Mpix for the V1)
2. 15fps frame rate with silent shutter
3. Better ergonomic layout of controls
4. Smaller, more compact size
5. A couple of "interesting" features - "best shot", "motion capture?"
Further, a new lens is introduced - Nikon 70-200mm f/4, which is much lighter and more compact than the old 70-200mm f/2.8, which may offer an ideal size/weight combination for long-range shooting. So, I bought the lens.
How to set the ideal exposure:
Method 1. Aperture priority, manually set aperture and ISO
Set the desired aperture (usually wide open), then adjust ISO to get a fast enough shutter.
Needs adjustment if ambient light changes
Method 2. Shutter priority, manually set shutter and ISO
Set the desired shutter speed (usually 1/1000sec) and adjust ISO to achieve the optimal aperture
Needs adjustment if ambient light changes
Method 3. Aperture priority, auto ISO
Set the aperture. ISO and shutter speed will be set by the camera. No minimum shutter speed setting so difficult to freeze motion.
Not a great setting for fast moving objects
Method 4. Shutter priority, auto ISO
Set the shutter speed and the camera sets the aperture and ISO. Need to check but believe aperture is set to the widest for a particular shutter speed, then ISO. This may be the optimal combination
Method 5. Manual exposure, auto ISO
Set the shutter speed and aperture manually, ISO will be set by the camera. Also a good alternative. However, if you need exposure compensation, this is not available under manual exposure. You take what you get.
Update, Jan 20 2013
I did some further tests with the V2 / 70-200mm f/4 / TC-20EIII. I wanted to see if this was the best configuration for our up-coming NGS trip. Here's some observations and conclusions:
1. Manual exposure (1/1000sec. f/8) with auto-ISO seemed like the best configuration for photographing birds. No exposure comp available. If I wanted to do exposure comp. I switched to "S" mode, set shutter to 1/1000 sec and the camera did the rest.
2. With this combination, the max aperture was f/8 which meant that bright sunlight was needed to get a reasonable ISO and low noise. The quality at f/8 (wide open) seemed very good
3. Even in bright sunlight, capturing focus was a problem. I generally needed to zoom out to 70mm (equiv), focus, then zoom in while maintaing focus. This took time. I tested without the TC-E20 and focus capture, while still not perfect, was quicker. Once focus was acquired, the shots looked well-focussed. Not many shots were missed due to false focussing.
4. The EVF "lag" was an issue in trying to get a quick shot. It took 1-2 secs for the EVF to come on. Once the shots were taken, it took another 1-2 secs for the EVF to become active again. Note: turn image review OFF. This will eliminate the "lag" after the shot.
5. With the electronic shutter and set to "silent", it's hard to know how many pictures you are taking at 15fps. I took a lot without really knowing it. Unless you need complete silence, I'd turn the silent mode off.
6. Over 1000mm focal length is a bit tough to handle in terms of getting the picture framed, hand-held. Plus, even at 1/1000 sec, and VR, I could see some effects of motion blur on some pictures.
Bottom line, while the combination V2 / 70-200mm f/4 is a very compact configuration for extreme telephoto situations, it has it's limitations which really relegate it to photographing objects that don't move too much. Elephants and lions - yes, birds in flight - no. Unless you need the extreme reach, I'd recommend not using the teleconverter since it makes focussing more difficult and you lose 2 stops of aperture which could require high ISO settings in lower light conditions. For travel, and especially safaris, I think this could be an ideal combination.
Note. Using the 70-200mm f/4 on the D800E makes for a nice medium telephoto combination without losing too much to the bigger f/2.8. While not tested, I'm assuming that focus capture will be quicker than on the V2, plus there are more focus modes to play with. I also assume that the D800E will be more tolerant of the TC-E20 since it has better and faster focussing as well as better high ISO performance.
Comparing cameras:
Nikon 1 V2, 70-200mm f/4, set at 200mm. Equiv. focal length = 540mm. Resolution 4608 X 3072 (14 Mpix)
Nikon D800E, 70-200mm f/4, set at 200mm, w/TC-E20III teleconverter, DX mode. Equiv focal length = 600mm. Resolution 4800 X 3200
This data suggests that the D800E, in DX mode (or cropped), with the TC-E20, will have slightly higher resolution than the V2, without the TC-E20. Of course, there's a big difference in weight and size (and cost!)
Another comparison is with the D7100 (6000 X 4000) with 1.5X magnification:
No TC - 1.5X magnification X 6000/4608 (1.3) = ~2
TC-E14 - 1.5 X 1.4 = 2.1 magnification X 1.3 = 2.73
TC-E17 - 1.5 X 1.7 = 2.55 magnification X 1.3 = 3.3
TC-E20 - 1.5 X 2.0 = 3.0 magnification X 1.3 = 3.9
This suggests that a D7100 with a 70-200mm f/2.8 + TC-E14 will achieve the same reach @V2 resolution as the V2 70-200mm f/4 (the TC-E14 loses 1-stop) on the V2. This is probably the better option than the D800E.
Comparing the Nikon 1 V2 w/ 70-200mm f/4 lens with Nikon D7100 w/ 20-200mm f/2.8, TC-E1.4.

Length 10” 12”
Width 4” 10"
Update, April 2013. After NGS trip to Africa.
On this trip, in Botswana, I used the Nikon 1 V2 with the Nikon 70-200mm f/4 for most of the telephoto shots and I have to say it worked very well. Even with AF-S center focus point, I had no difficulty focussing on distant subjects (in sunlight) and getting a good result. I never used the TC since I wanted the best aperture and never needed the extra reach.
Update, January 28, 2014. Here’s a post from DP review:
For those interested, I have some setting tips for getting the best possible image quality from their Nikon 1 cameras. These tips are based on my experience shooting thousand of photos with the V1 and information gleaned from Thom Hogan's "Complete Guide to the Nikon 1". You may agree with them or not, but feel free to comment on my suggestions or make post some of your own in this thread.
- Use "Neutral "or "Portrait" Picture control to retain maximum tonal (dynamic) range. Avoid using "Landscape" or "Vivid" which reduce tonal range and color pallet.
- Avoid using apertures smaller than f5.6 to avoid diffraction softening of the image. (Use Aperture priority in bright light to avoid small apertures that may inadvertently result from using Shutter Priority).
- Turn Noise Reduction (NR) OFF for ISOs of 100-400, as it is applied to ALL ISOs (including RAW files), when turned on and will unnecessarily soften detail at low ISOs. Turn NR on only at 800 ISO and above.
- Set Sharpening to zero and do your sharpening on your computer using ViewNX2, LightRoom, or other software of your choice (I find Picassa does an especially nice job of sharpening with N1 files for some reason) . By doing this you will retain more detail and can avoid sharpening artifacts. This is especially true at high ISOs.
- Use ADL only in bright high contrast scenes and Turn ADL off when using ISO's above 400 to avoid excessive image noise or in low contrast scenes to avoid lowering contrast.
- Use the lowest ISO possible to maximize tonal range. 100 ISO has the greatest tonal range, but ISO 200 is not far behind and even 400 ISO is quite good., so don't avoid the slightly higher ISOs when you need them. At high ISO's the dynamic range get smaller rapidly.
- Always use a lens hood to avoid flare and increase contrast. I find the 10-30mm lens is especially prone to veiling flare and even the Nikon lens hood is too shallow to avoid it.
- When shooting with the V1, or V2, use the electronic shutter to avoid possible micro-blur caused by the mechanical shutter shock.
- Only the sharper N1 lenses with better micro-contrast will make the 1" sensor shine. The 10-30mm lens just doesn't do it, IMO.
- If you find your flash photos are underexposed, try using Program mode for your flash photography.d
- For the best possible image quality, shoot in RAW mode and process with ViewNX2 or Capture NX.
- When shooting JPEGs, use FINE JPEG only and make adjustments in the Picture controls in the camera to your liking and do as little post processing as possible. The reason for this is that N1 cameras do all their Picture Control adjustments (tone curves, color, noise reduction, sharpening, etc), on the 12 bit data which has been rendered into 16 bit set of pixel data and is only reduced to 8 bit JPEG data afterwards. What this means is that in-camera JPEGs are processed with much more data resulting in high IQ than will be available in post processing of JPEGs.
Update. May 11, 2014
Nikon 1 V2 with the Nikon 80-400mm f/4.5-5.6G
I had read positive reports on this lens and felt like it might be a great combo with the V2. It’s not cheap so expectations are high.
I took this combo to the Galapgos on our recent trip.
I need to do a proper test but here are a couple of observations:
On the V2:
1. I took a number of photos at 400mm, wide open (f/5.6). These looked soft. Most were taken at 1/1000th sec. I think at this focal length (over 1000mm) that this is not fast enough and I’m seeing motion blur.
2. Also, with these settings, I saw a lot of color fringing and chromatic abberation. This was correctable in LR
3. Backing off on zoom (to 300mm) made a significant improvement in sharpeness, even at 1/1000, f/5.6 which suggests it is more to do with the lens itself, or a combination of factors
4. Using the same settings on the D800E produced high quality images (no motion blur or other artifacts)
Update. May 26, 2014
Nikon 1 V3 with the 80-400mm f/4.5-5.6G
While I need to do more objective tests, I wanted to see what the limitations of this lens were on the V3. Subjectively, it looks like with the lens at 400mm and f/5.6, the results are not great - soft images. So, I decided to limit the use, at max zoom, to higher f-stops than 5.6 (I used f/6.3 and f/7.1). Ideally, it should be 1-stop higher (f/8). I took shots of subjects at a long distance as well as relatively close up (at pajaro Dunes).
At long distances (several 100 feet), the picture quality was not good, at any setting. The quality was also not good on the 70-200mm f/4 lens. I ultimately put this down to atmospherics and not the camera/lens combination.
Update. July 5, 2014
I have been testing the new 70-300mm CX lens and comparing it to the 70-200mm FX lens using the FT1 adapter. I also did a comparison between the V2 and the V3 with the 70-200mm since I had a suspicion that the picture quality was a bit better with the V2.
All pictures were taken handheld, AF-S, at ISO 400.
In doing the comparison, I matched exposure and WB as best I could. I sharpened all with Diglloyd standard sharpening and I resized all images to 2880X4320 pixels / TIFF in Photoshop to normalize resolution between the V2 and V3 (2880 = 8” at 360dpi)
On the first topic, here’s a 100% screen grab of the V3 comparing 70-300mm (set at 200mm) versus the 70-200mm/FT1 (set at 200mm). Both lenses were “wide open” - 70-300mm @f/5.6, 70-200mm @f/4. This is a bit of an apples to oranges comparison but I wanted to know how the lenses performed at the extreme.

Clearly there’s more DOF with the 70-300mm. However, looking at the center focus point, the 70-300mm shows more detail than the 70-200mm and with more contrast. Either one is acceptable but the 70-300mm is marginaly superior.
The next compariosn was between the V2 and the V3 using the 70-200mm/FT1 combo. I had noticed that I was getting a greater percentage of “soft” or out of focus pictures with the V3 than the V2 and wanted to see if this was equipment or technique
Here’s the comparison: (100% crops)

The image on the left is the V3, the image on the right is the V2. It’s hard to tell but the V3 image is slightly sharper with more detail, especially in the wooden log stand. However, you can just see that the detail on the chair at the top is better on the V2, whereas the detail on the grass below is better on the V3. Overall, I have concluded the following:
1. There’s no significant difference in picture quality between the V2 and V3 when normalized to a fixed image size.
2. Optically, the 70-200mm f/4 works just as well on the V3 as the V2 except that the V3 seems more sensitive to small movements and has less consistency of focus. Best technique is to make sure the focus target is positioned correctly and that the camera is held as steady as possible, even with VR on. If possible, allow the VR to “settle” for a second or so before taking the shot.
3. I suspect there’s a (small) difference in focus alignment between the V2 and the V3 resulting in different areas of the image being better or worse focus. This could be the FT1 or due to small differences in the alignement of the cameras. I think I’ll buy another FT1 and do a comparison.
Finally, I compared the V2 to the V3 with the new 70-300mm. Here’s the comparison (100% crops).

The V3 is on the left.
Again, it’s hard to tell from these images but, after normalizing resolution, the V3 shows slightly more detail than the V2 - see the log to the left of the rope hanging down. Overall, this is a great lens and I can’t wait to try it out with the V3’s focus modes
Update 09/28/2014
New toys - Nikon D810 w/ 80-400mm.
The effects of small sensor size (V3 relative to the D810) is to increase the effective focal length of lenses. A 200mm lens on a V3 is equvalent to approx. 540mm lens on a D810 (actually 2.72 multplier) and approx. 300mm on a D7100 (actually 1.55 multplier). However, each camera has a different image resolution (D810 = 36MPix, D7100 = 24Mpix, V3 = 18MPix). As a result, you can calculate an “adjusted” multplier which takes into account the differences in image reolution (think cropping the larger images to fit the same size as the smaller ones). Below is a table which shows the calculations:


You can see that, comparing the V3 to the D810, while the focal length multiplier, based on image sensor size, is 2.72, when this is adjusted for image resolution, the adjusted multiplier is reduced to 1.93. For the D7100, the multplier is adjusted from 1.78 (relative to the V3) to 1.55.
I did some tests to confirm this result. I captured an image with the D810 (@100mm), D7100 (@160mm) and V3 (@200mm). Comparing resulting 100% crops showed that the image sizes (at the pixel level) were the same.


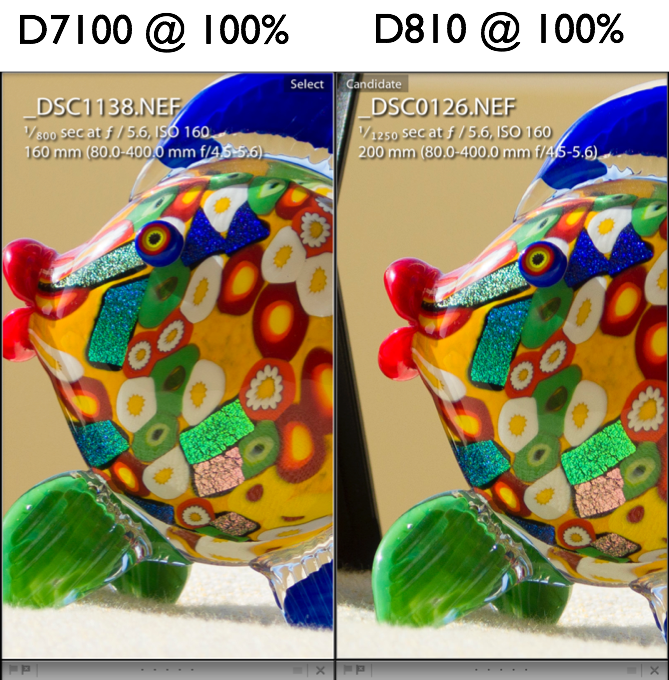
Another observation from this test is that the image quality, comparing all three cameras at the pixel level, is remarkably the same. Each camera was independently calibrated using Passport, exposures were equalized and gray balanced. Images were sharpened equally using Diglloyd-std. All images were captures at ISO 160 (base ISO of the V3).
While this is a nice result at base ISO (for the V3), I suspect that differences will immediately become clear as the ISO levels are increased. This is a subject of another test later on.
More on the Nikon 1 70-300mm (February 20, 2015).
Despite the above results, I’m still trying to understand the limitations of the V3 / 70-300mm combination relative to much larger, more expensive alternatives. When photographing birds at the beach, I can see differences in quality (sharpness, color saturation, etc.) between the V3 / 70-300mm @300mm and V3 / 70-200mm + 1.4X / FT-1 @280mm.
To be fair, the 70-300mm CX lens costs $1000. The 70-200mm f/4 + 1.4X TC costs approx. $1650.
I did a series of tests with a resolution chart to see if I could measure the differences. here’s the chart:

I focussed the tests on the same distance as I would normally use when photographing birds:
30ft with 300mm/CX (~800mm equiv), 20ft with 200mm/CX
The lenses I tested were chosen to give approximately the same size image at 100% magnification:

I have not yet completed all the combinations but first results show a clear difference between the V3 / 70-300mm CX and the V3 / 70-200mm + 1.4TC FX. The former shows softness and lower resolution overall.

Images are right out of the camera, no adjustments, shown as 100% crops.
I also saw a clear difference between the V3 / 70-300mm CX @300mm and the 80-400mm FX @300mm:

When I set the lenses to 200mm @ 20ft, things looked much better:

I also did tests at different apertures on the V3. There was some improvement as the apertures went narrower. However, there is little variation in softness as you change the aperture or zoom factor (until you get to 200mm). Also, I did some tests handheld with VR and got very similar results to the tripod tests. Just as well since 90% of pictures will be taken at 300mm / f5.6, handheld.
OK, this softness may be the price of having a less expensive, more compact lens, without the focussing restrictions of the FT-1. Or, it may be that I just have a bad lens sample. I suspect the former but don’t have any comparison.
For now, the objective is to make the best out of the 70-300mm CX lens by using best-practice technique in shooting an in post. As an example, here is the first comparison from above, both images processed in DXO and Lightroom:

Here you can see that most of the differences have been processed out resulting in very similar sharpness between the two configurations. The workflow, for both images, to achieve this is as follows:
1. Export to DXO
2. Adjust exposure +1 stop
3. Clearview @ 30%
4. PRIME noise reduction
5. Export as DNG back to Lightroom
6. Sharpen with Diglloyd Std.
As a further illustration of the difference, here is a comparison of the same image. The version on the left was processed in the “conventional” way, all in Lightroom:
1. Exposure +1
2. Diglloyd standard sharpening
The version on the right was processed with the Lightroom/DXO combination described above. Pretty impressive!

Let’s now apply this technique to some real-world examples.
Again, 100% crops.
Here you can see the dramatic improvement that can be made. The processed image had exposure reduced by .5 stop. I also applied slight additional sharpening and saturation to the beak and eye area of the left image.

And more.

Shooting techniques.
1. OK to shoot at 300mm f/5.6
2. Fill the frame so you don’t need to crop. The V3 sensor has very little tolerance for cropping, both in image resolution as well as pixel quality (DR). If you can’t fill the frame with 800mm equiv., you need to get closer
3. 1/500sec seems to be OK for relatively static objects. To capture motion, you’ll need to go to 1/2000sec or above
4. Using DXO, ISO’s can go up to 800 without much of an issue
5. While focussing seems quite consistent, take multiple shots (10fps is enough)
6. If you want to focus on the eye, adjust the focus point in the viewfinder. Get the composition right so you don’t need to crop.
7. If possible, calibrate with Passport. At least use a gray card. This seems to make a significant improvement in color quality.
8. ETTR. Important to get the most DR. Experiment, go for just a few blinkies then compensate in post. But, be careful, the V3 doesn’t have much exposure latitude
9. Handheld is OK or use a monopod. Turn VR off when using a tripod and when shutter speeds are above 1/1000sec.
Update. February 24, 2015
Continue to be not satisfied with the 70-300mm at full zoom since there is a clear difference in quality (sharpness) between 300mm and 200mm. Plus the sharpness of the 70-200mm (+1.4TC) and the 80-400mm with th FT-1 is superior to this lens at 300mm.
As a follow up, I compared image quality between the V2 and the V3 and found them to be very similar (as expected). What was not expected was the difference I saw between having the UV filter on versus off. Who would have thought an UV filter would make a difference? Well take a look.

The 100% crop on the left is with the filter on. The crop on the right is with the filter off. I sampled this over at least 20 images and got consistent results. Exposure is approximately the same and all other settings are identical. This was also taken hand-held, VR - Normal.
The filter is: Hoya alpha MC UV 62mm. $24.90 from Amazon.
While there remains a noticeable difference in sharpness between 200m - 300mm, that difference is now much less. Interesting that the blurring effects of the filter are not so visible at 200mm.