This section deals with the process to curate and print a high quality photo book or album. The process is based on a book I am creating for the Marin Museum of Contemporary Art, March 2018. The book is a showcase of ten artists from MarinMOCA and is being submitted to their Altered Book Exhibition, 2018.
For background information on printing, please refere to the section on this site: Color_Management_Printing
Things to consider in making a book:
1. There are many services in which you can send in images and they’ll make a book for you. Quality varies but it’s the easiest way to create a book of printed images. Examples include:
Blurb www.blurb.com
Shutterfly www.shutterfly.com
Apple Photo Book
2. If you want to go one step further and print your own book, then things get much more complicated.
a. Pick a book cover and size
b. Pick a paper stock that suits the style of the book
c. Decide on layout - single image per page or multiple images
d. You’ll need a high quality printer with the right print profile, or make your own profile
e. You’ll need professional level software (like Lightroom otr Photoshop) where you can preview the print befor committing to paper.
Overall, you need to decide on the quality level of the book since this will determine how much work it will take. Do you want to express a particular style that would not be reflected in any of the standard printing services? Do you want exhibition print quality on every page? Do you want to mix text and images?
For me, the criteria were quite clear:
1. This was to be a “1-off” book with original images, printed to the highest quality
2. It needed to be a size that woul get attention yet not be too un-weildy. I picked 11X14 page size
3. It need to be assembled by hand without too much difficulty.
4. The final result needed to be robust enough for regular handling without falling apart
Description of my book.
The project was to showcase the artisits of Marin MOCA by photographing them, in there studios, doing their work. My objective was to show each artist’s style, personality and invidiuality through capturing them in their highly personalised studio environment. I found this to be a fascinating subject and firmly in the “genre” of environmental portraiture. These artists tend to work alone. They get little exposure and recognition outside of the end product of their work. I was able to “sign up” ten artisits who were willing to do a photo shoot in their studios. I allocated an hour for each shoot and did ten in all.
The equipment I used was the following:
Nikon D850
For wide angle studio shots - Sigma 14mm f/1.8 - Fabulous wide angle lens
For environmental portraits - Sigma 35mm f/1.4 or Sigma 50mm f/1.4 - both great, sharp lenses
For close up portraits - Nokon 105mm f/1.4 - "The Beast" - ultra-sharp portrait lens
For lighting, I used a Nikon SB910 inside a 24" square soft box, triggered from an SU-800 mounted on-camera.
I tested various settings ahead of time (at home) to make sure I could walk into the studio and start shooting immediately. This was particularly important for using flash where I found the ideal setting was about +.7EV compensation.
From a total of about 1400 images I selected 5 images per artist for the book. Along with an original title card from the artist, these would be arranged on 2, double-sided pages. With an additional page for acknowledgements and introduction, this would result in a book of 21 pages.
Selecting a book cover and binding:
For ease of assembly, I picked covers which had screw-post binding. Also, some pages would be separated by protective sepia pages which could easily be made to fit using a standard three-hole punch. There are two sources I know of which offer high quality covers in this format:
KOLO - https://www.kolo.com/collections/albums-photo
Pina Zangaro - https://www.pinazangaro.com/
I ended up picking the Pina Zangaro BEX binder, 11 X 14 Landscape - https://www.pinazangaro.com/products/screwpost-binders/bex-screwpost-binder. This was quite expensive ($70) but lower priced than most options. I also knew I would be putting a sleeve over the cover so the "look" was not that important.
Now for the paper. Pina Zangaro offers high quality matte, scored paper in a variety of sizes. The paper is supplied by MOAB (Lasal Photo Matte 235) and they offer print profiles from their website. See - https://www.pinazangaro.com/products/inserts-and-pockets/scored-inkjet-paper. The paper is double-sided which is what I was looking for.
It looks like the scored paper is only available through Pina Zangaro and only available as Lasal photo Matte 235. So, that was my choice. Of course, because of the binding, the paper is not exactly 11 X 14. More like this:
These dimensions are crucial in placing the images accurately on the page. Also for the reverse side the dimensions would be a mirror image of the page above.
With a lot of trial and error I defined the size and spacing of various image sizes, taking into account the asymmetry of the scored paper. Here are some examples (dimensions are all in inches):
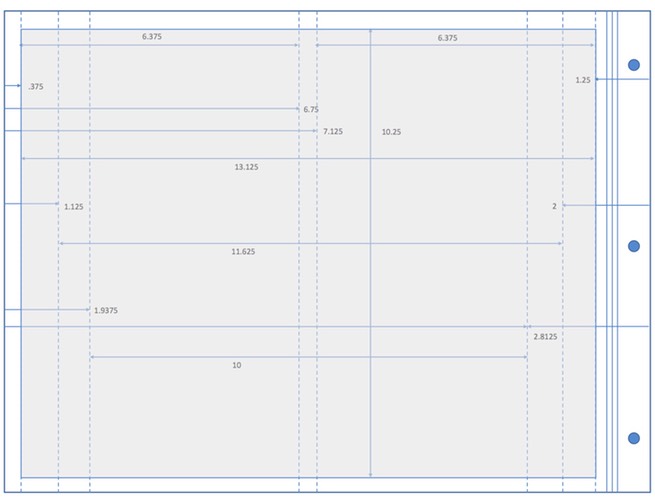
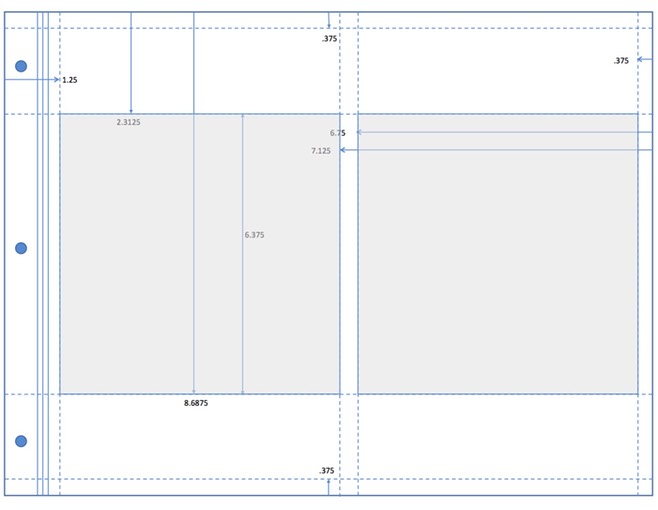
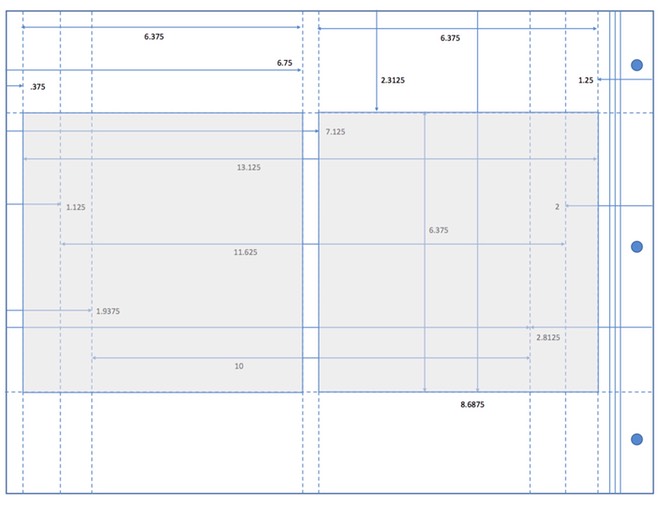
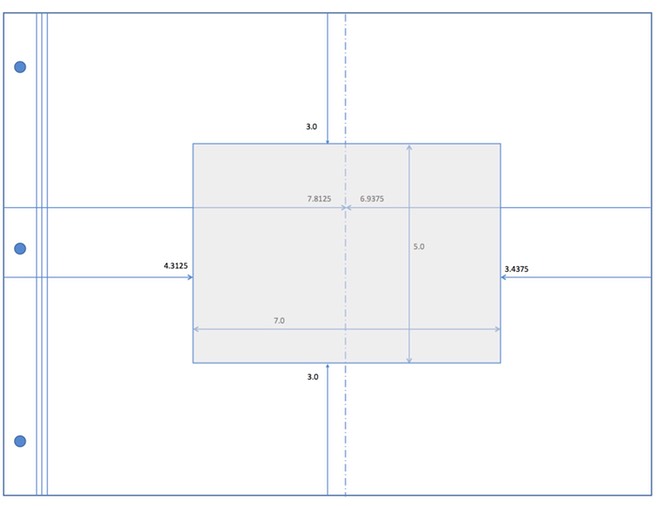
I determined that a border of .375" was about right for around the edge and also separating multiple images on the page. The border width at the scored edge was set at 1.25" which made the images look approximately centered when added to the book.
Full-page images were sized at 13.125" X 10.25". Square images, 2 per page, were sized at 6.375" square. Other sizes were accomodated and positioned at the (perceptual) center of the page. Each Artisit had a title page of original art that was on a 5" X 7" card, centered on the page as shown above. The next step was to size and print selected images so they rendered at the same exact sizes and positions on the page as was intended.
Printing the images.
Some things to consider:
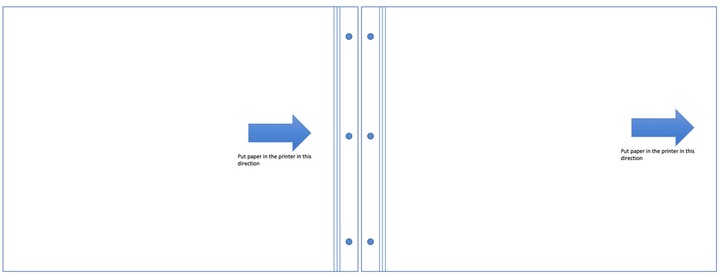
1. With double-sided printing, on scored paper, it's important to put the paper in the printer in the correct orientation depending on whether the image is to be printed on the front or the back of the page.
2. I learned early on that it's challenging to ensure that the printer retains the designated image size. When printing 8X10 images on 8.5X11 paper I use the "borderless, retain image size" in the printer settings. The paper I'm using here is a custom size so particular attention was paid to making sure the image sizes were retained.
3. I much prefer using Lightroom for printing. It's easier than Photoshop because output sharpening can be applied at the print stage. In Photoshop, output sharpening requires additional layers and optional plug-ins.
4. I also prefer Lightroom for soft proofing. With the split screen option, it is easy to (approximately) match the soft proof with the original image, making adjustments to exposure, contrast, vibrance, etc.
5. Lightroom doesn't deal with multiple images per page so I used Photoshop for image placement on the page.