Flash Guide Number.
I now have a variety of flashes and my question is on how to compare the relative light output from each one. The specs are all over the map and hard to compare. However, commonly, the light output is measured as Guide Number (GN). So, I need to measure the GN of each of my speedlights to get a good calibration on their relative strengths.
Guide Number = [Flash to Subject Distance] x [F-Stop] - ISO is set to 100
Below is a set of instructions on how to do this plus some background material.
https://www.lencarta.com/studio-lighting-blog/how-much-flash-power-do-you-really-need-for-your-home-studio/
Testing:
The guide number tests are (or should be) carried out to a benchmark standard.
1. The flash head is fitted with a standard reflector (or nothing in the case of speedlights)
2. The flash head is placed with the flash tube 2m from the flash meter (incident) used to measure the light output - use the “flash” setting on the light meter
3. The tests are carried out with the (incident) lightmeter set at 100 ISO
Using these test conditions should ensure that if you buy that flash head you should be able to get the same results as the tester, although results will vary a bit, depending on the size and decoration of your studio – a small studio with a low white ceiling and white walls will produce higher readings than a large studio with a high black ceiling and black walls.
Guide numbers are expressed in 2 different ways, metres and feet, but the results are the same. For example, the SmartFlash has a guide number of 100 (ft) or 32.8 in metres. Dividing the number of feet into 100 or the number of metres into 32.8 gives the same result.
Let’s assume that the guide number is expressed in feet, and that the guide number is 100. What does that actually mean?
Well, if you divide the distance in feet into the guide number, the answer is the lens aperture that you will get with the flash head set at full power at that distance from the subject. For example, if the flash head is 9′ from the subject then 100 divided by 9 is 11 (near enough) so a lens aperture of f/11 will give the correct exposure.
It follows that if the flash head is only 4 1/2 ‘ from the subject the correct aperture will be f/22 and if the flash head is 25′ from the subject then the correct aperture will be f/4
So, if the flash head is 25’ away from the subject (say a very large group of people) then either you need more power or you need to find a way of working around the lack of power, and we’ll get back to that.
First tests.
I followed the above instructions and tested the Nikon SB5000. I used the Lumu incident light meter on the iPhone. I kept the room as dark as possible so that the reading was not affected by ambient light. I set the Speedlight to manual, full power and adjusted the zoom position as needed. The results I got were quite a bit off from the specifications (GN = 34.5 @ 35mm focal length):

Possible reasons for differences:
1. Room (Gym) has few reflective surfaces resulting in a lower GN
2. Flash spec is wrong
3. Incident light meter is out of calibration.
4. The (flash) ISO is not accurate
I should re-measure and also expose a gray card to check the calibration of the light meter. Stay tuned.
Second Test:
I moved the test location into the garage. This has less reflections than the gym. Here’s what I learned:
1. At 35mm, ISO 100, Shutter speed - 1/200 (no ambient), I got the same reading of f/13 resulting in a GN of 26
2. I put a 35mm lens on the camera and shot a selfie at the above settings. The result I got was a bit over-exposed.
3. I then set the camera to f/14 and f/16 and did the same shot. See below:
Aperture at f/13:

Aperture at f/14:
Aperture at f/16:

Remember, the spec’d GN for the SB5000 is 34 which translates to f/17 at 2m (ISO 100). The difference between F/13 and f/16 (max on the lens) is 1/2 stop. However, the GN goes from 26 to 32. So, even small changes in f-stop result in proportional changes in GN. It seems reasonable that this fairly crude set-up would not be any more accurate than around 1/2 stop from the flash spec. BTW, during this test the SB5000 indicated that the optimum distance for correct exposure was 2.2m at f/16 and 2.8m at f/13. It’s not clear whether these numbers are from Camera to subject or from Flash head to subject. For reference, the distance from the camera lens focal plane to the end of the flash head is about 2-3inches (approx .2m)
Anyway, any of these images would be acceptable exposures although f/14 looks about right. (forehead brightness is 86%(R), 74%(G), 65%(B).
Next I tested the Godox V1. Without going into too much detail, I found that the power at 1/1 was similar, maybe a little less, than the SB5000. Color balance was slightly different. Curiously, the Lumu iphone app could not detect this speedlight. Don’t know why but this does not instill confidence in the Lumu.
Here are the results from the Godox V1:

Here you notice there is not so much change in GN as the zoom is changed. The only speculation I have is that the nature of the round head on the V1 makes the light beam less sensitive to zoom factor. Whatever the explanation, handy to know this characterisitc. Notice, however, that the measured results are much closer to the V1 Spec (measured GN = 26@50mm versus 28) and is the same as the SB5000.
Next test was the LumoPro180. Again, similar results to the SB5000.
What is the conclusion?
1. All these camera-mounted flashes have about the same output power
2. The actual power achieved is about 1/2 - 1 stop less than specified, probably due to a variety of factors including the room environment, accuracy of the light meter, differences in ISO calibration between the camera and the flash, etc.
3. All three flashes rendered with a slightly different color balance - camera was set to flash color balance in all cases.
4. Using an incident light meter is probably of marginal use in real-world situations.
Side note, May 23, 2019:
http://dpanswers.com/roztr/content_show.php?id=317
Watt-Seconds vs. Guide Numbers
Guide numbers are mostly used on speedlights and watts-second is being used on monolights. Does anybody know the computation from Guide Number to Watts-Second and vice versa?
One response:

Watt-seconds (Ws) is a unit of energy. When reading flash unit specifications, the Ws rating is the amount of energy that can be stored in its capacitors and released when the flash is fired.
The Guide Number (GN), on the other hand, is a measure of light. It indicates how intense the light from a single flash is when falling on the subject.
There is no simple conversion formula between the two. While the energy that at most can be expended in a single burst of flash is proportional to the number of Ws' stored in the flash unit's capacitor, the actual intensity of light also depends on the efficiency of the light source, and any reflectors or diffusers in use.
However, as a rough rule of thumb, multiplying the square root of the Ws number by 4 (meters) or 13,2 (feet) usually gives a rough indicator of the GN in at ISO 100 for a standard parabolic reflector with a light spread matching a 35 mm FX lens. The inverse function computes the Ws from the GN with a 35 mm light spread in meters or feet.
GNm = SQRT(Ws) x 4
GNft = SQRT(Ws) x 13.2
Ws = (GNm/4)2
Ws = (GNft/13.2)2
Example: a studio flash with rated at 250 Ws may have a light output equivalent to a speedlight with a GN of 63 (meters) or 209 (feet)
Note that light spread affects the GN, but not the Ws rating. If two identical studio flashes both are rated at 150 Ws, and one is fitted with a reflector with an angle of illumination of about 45 degrees, and the other fitted with a reflector with an angle of illumination of about 90 degrees, the flash with the narrow cone reflector would have a higher GN than the one with the wide reflector.
In terms of energy consumption, a 60 watt tungsten bulb burning one second, a 600 watt halogen light being lit for 1/10th of a second, and a xenon tube electronic flash burst consuming 60000 watt for 1/1000 second all equals 60 Ws. However, a xenon tube is much more efficient converting energy into light than the other two, so even when fitted with the same reflector, the 60 WS electronic flash will produce more light than each of the other two. Translated into GNs, the GN of the electronic flash in this example would be greater than the GN of the tungsten bulb or the halogen light.
Measuring the GN of a flash is straightfoward. Just fire the flash and measure its output with an incident flash meter set to ISO 100. Multiply the aperture reading with the distance in meters or feet, and that's the GN of the flash in meters or feet.
There is no simple way to measure WS, so one have to rely on manufacturer's specifications. I suspect that some of the Ws ratings used to advertise studio flashes are not set by engineeing, but by the marketing department.
Update, July 4, 2018
Since my last set of notes on Portraits and Lighting, I have accumulated a variety of flashes and triggers as well as, now, a number of additional cameras - SONY and FujiFilm. I also completed the photography workshop in 2016 (under Andrew Hetherington) and will do another workshop this month (under Mathias Clamer).
While having learned a lot about the complexities of lighting for portraits, I now have a confusing array of alternative lighting accessories which need some organizing. This set of notes attempt to do this as well as update my experience in getting predictable results under different circumstances.
First, here are all the flash & trigger alternatives that I’m dealing with:

OK, let’s start with the simplest, most up-to-date, set-up for Nikon:
D850 (Shooting Bank A (MIKE), Custom Settings Bank B ( FLASH_SELFIE))
SB5000 Speedlight (set to remote)
WR-R10/WR-T10/WR-A10 radio trigger and remote control.


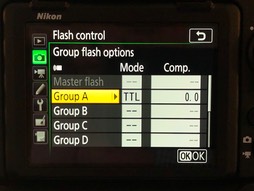
The easist way to check the flash settings on camera is to press ine “Info” button twice. You will then get a screen which shows the flash and exposure status:

Then press the “i” button to get access to the flash menu:

From where you can drill down and adjust the remote flash(es) for each group.


Archive (2016 and earlier):
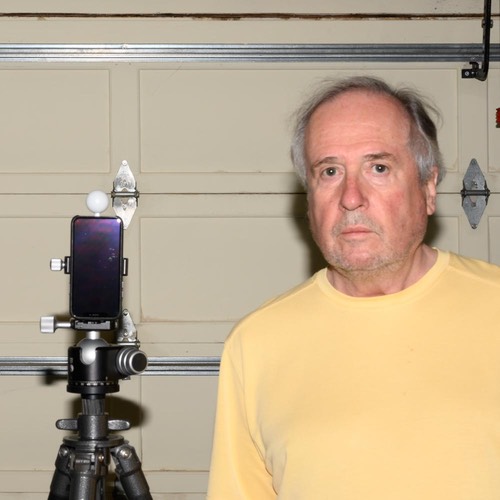
Since I am taking a photography workshop in March 2016, on Portraits, I thought I’d have a go at seeing what I could do on my own. Here are a few experiements I went through.
Experiment #1. - Single, large softbox
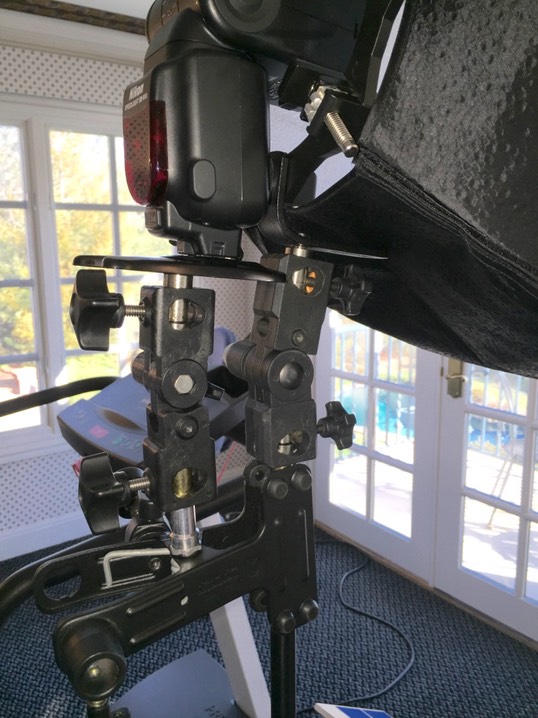
Attaching a speedlight to the softbox is complicated.I started by attaching the softbox to a light stand via a standard umbrella adapter so I could adjust the angle


I then created a set-up to hold the speedlight at the correct height and angle which I could clip on to the light stand


I’m sure there’s a better way but at least this gave me the flexibility I needed.
2. Exposure notes.
a. The backdrop is a white blind so when exposed to full auto-exposure (Aperture priority on camera, TTL on the flash) the subject came out under-exposed by 1+ stops. So I dialed in1-stop flash comp. This was a little surprising since matrix metering had face detection ON (b5) which I thought would bias the exposure to have the face correctly exposed.
b. Decided to go full manual, wanted to try f/1.8 to see how well the camera focussed. Used an incident light meter to figure out how much flash was required. Unfortunately, the “no-cord” setting on the flash meter did not give the correct reading (maybe something to do with the diffuse light out of the softbox). So, I connected the flash meter to the flash, with a suitable cable, and took a reading. This time it was accurate. However, since the flash was set to “remote”, I needed to change this to “on” to enable the light meter to activate the flash. So, I did this, set the correct flash setting for the ambient conditions and f/1.8. I then had to take this reading, turn the flash back to “remote” and dial in the reading on the D810 “commander” menu setting. This worked but was tedious and not a good solution going forward. The result was a correct exposure and, importantly, good AF on the nearest eye of the subject. OK, I have a way to do self portraits.


I also tried an LED light, on the floor in front of the subject (me!) pointing up at 45 deg. Power was set to 75%, color temp 3900 deg K. This lit up the lower face and neck and gave a warm glow to the image.

I used the same set-up but with the SONY A7R II coupled with the Nissin Air 1 & Di700A flash unit. I achieved similar results with the following noted:
1. The A7R II focussed much more consistently on the “eye” (using wide angle focus area and face detection) with sharper results
2. I got good exposure without need for compensation, unlike the D810 which required +1 stop of flash comp.
I also tested the D810 with the Air 1 and Di700A. This worked just like the Nikon flashes. I also needed to dial in +1stop of exposure comp. I found I needed this independent of whether I set Matrix metering - face detection (b5) to on or off.
As a side note, since I’m doing self-portraits, I’m relying on the D810 to do face detection and focus accordingly. Mostly this works OK (not perfect) but it really depends on how face-on you are to the camera. See the two examples below:
Straight on, good detection and placing of focus points:

Side-on, no face detection, bad placement of focus points:
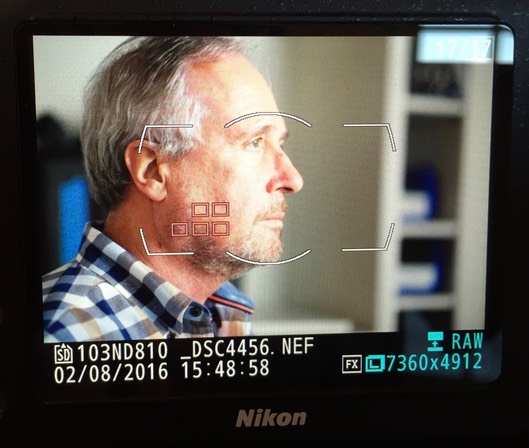
Also, you’ll notice that I changed the location and a darker background. These images still required some exposure compensation, but not as much (+.7EV) - top photo. Looks like the bottom photo (also +.7EV) is slightly over-exposed. Can’t wait to get back to manual exposure!
Speaking of Manual exposure, here’s another “discovery”. As I Mentioned above, I was unable to get my trusty incident light meter (Minolta) to register the correct exposure in the “no-cord” flash mode. If I connected the light meter directly to the flash via the appropriate sync cable, it worked fine. I was using the D810 in “commander” mode with a remote SB910. It occured to me that the pre-flashes from the D810 on-board flash may be interfering with the exposure measurement and, after googling this topic, I had it confirmed that this is, indeed, a problem. Now, you may ask, why are you trying to take a meter reading with the flash set to TTL? After all , this is an “auto” setting so the exposure should take care of itself. Well, I found I had the same problem with the D810 set to manual mode for flash. It turns out that pre-flashes are still sent from the on-board flash, even in manual mode. So the meter reading was still incorrect. At this point, I decided to buy a new flash meter - Sekonic L-478DR. This meter didn’t make the correct measurtement either! Finally, I mounted an SU-800 on the camera and set all the channels to manual mode. Bingo, I got a good reading (at least in the ball park). However, the old Minolta meter still made incorrect readings. I later found out that the SU-800 uses both visible light and IR to communicate with the remote flash. I’m guessing that the Sekonic is more tolerant of these transmissions than the Minolta.
My conclusion is the following:
1. If you want to go full-manual mode, you’ll need an incident light meter to set up the camera and flash to get the correct lighting exposure and ratios (flash/ambient)
2. In manual mode, you have a choice of the following:
a. Use an SU-800 in manual mode with the Sekonic flash meter.
b. Use third party triggers in manual mode - Nissan (I like) or Pocket Wizard. I haven’t tried this yet, but will
Note: (a) is preferred since I can use all of my Nikon-compatible flashes. Otherwise I’ll need extra devices for each flash (or more Nissan flashes)
Experiment #2 - Small softbox

Here’s the clamp set-up I used. Notice that the clamp holding the speedlight is the same as for the large softbox
I have a number of objectives for this experiment:
1. See subjective differences between the small and large softbox images.
2. Explore different positions of the softbox and different exposure ratios (ambient/flash) using manual mode. I’m assuming that the smaller softbox will exxagerate these differences (versus the larger one)
3. Look at exposure accuracy (both Nikon & SONY) in TTL mode
4. Try various triggers to see how they work