On May 20, 2012, there was a (partial) annular eclipse that passed by the San Francisco Bay Area. I was able to photograph the stages of this eclipse and learned a thing or two about photographing bright objects in the process. The result was quite successful as shown in this montage below.
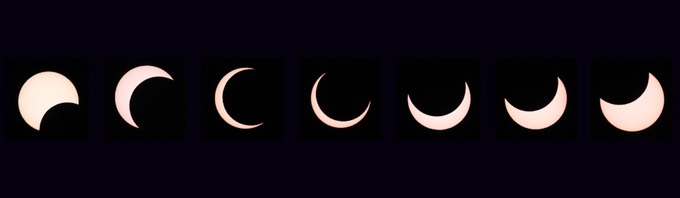
This series of pictures was captured between approx. 5:30pm and 7pm local time, with the "max" being at 6:33pm.
Background.
Scour the Internet and you can find out everybody's opinion on how to shoot eclipses. There's the obvious - don't look at the sun, especially through an optical viewfinder. There is a variety of opinion on what filters to use - apparently a "solar filter" is the thing to have but, unfortunately I don't have one of them. ND filters are not recommended since they only filter out the visible spectrum, letting through harmful IR and UV radiation. There are horror stories of "frying" the camera and lens due to heat build up when the camera is pointed at the sun for extended periods. Recommendations are given on adding the lens cap between shooting to keep the camera cool. Armed with all this data, I decided to take a conservative approach. I used the following equipment.
Camera - Nikon V1
Lens - Nikon 70-200mm f/2.8 w/ 2X teleconverter. This is equivalent to 1080mm focal length (@200mm setting)
Gitzo tripod and RRS ballhead
For filters, I had three layers - Singh Ray Vari-ND (2 - 8stops) + Singh Ray Mor-slo (5 stops) + 8-stop ND = 21 stops max. I found that I needed that much to be able to get an image in the VI's LCD that I could focus on. I found out quickly that what was shown in the LCD did not reflect the actual exposure.
Camera set-up. Manual exposure-1/500sec@f/6.3, ISO200-400. Remote trigger, manual shutter (I was worried that the electronic shutter might get fried)
Lens set-up. Manual focus, no VR
I focussed manually on the lens using a Hooloop (w/3X eyepiece) on the LCD screen
With this set-up, exposure settings as above, and the Vari-ND set to max, I was able to get a clear picture of the eclipse that I could focus on. The resulting image was under exposed so I took a series of shots, opening up the Vari-ND in steps. As I opened up the Vari-ND the LCD would "bloom" and distort the picture (maybe there's a setting where the LCD brightness doesn't change?). After each sequence I closed down the Vari-ND to protect the camera/lens.
Focussing was the most challenging component. First, the hoodloop, unless precisely aligned with the LCD would cause the LCD to switch to the EVF. This was incredibly frustrating - I don't know if it's possible to disable this, I don't think so. Second, even with a sturdy tripod, the long focal length made it very difficult to align the sun and challenging to get optimal focus. I'm guessing that part of the problem was atmospherics causing the image to be blurred anyway. I magnified the LCD to get the most detailed view. This also caused the image to move around a bit - at 1000mm, it doesn't take much to move the image!
Also, I saw motion blur on some of the pictures, probably caused by using the mechanical shutter. Next time I'll try the electronic setting.
I took shots for 10-15min then shut down the camera and put it in the shade for 5-10min to let it cool down. During this time I downloaded the images to see how things were going.
In the end everything worked fine and nothing fried or got broken, I think. Here is an example of a higher resolution crop.
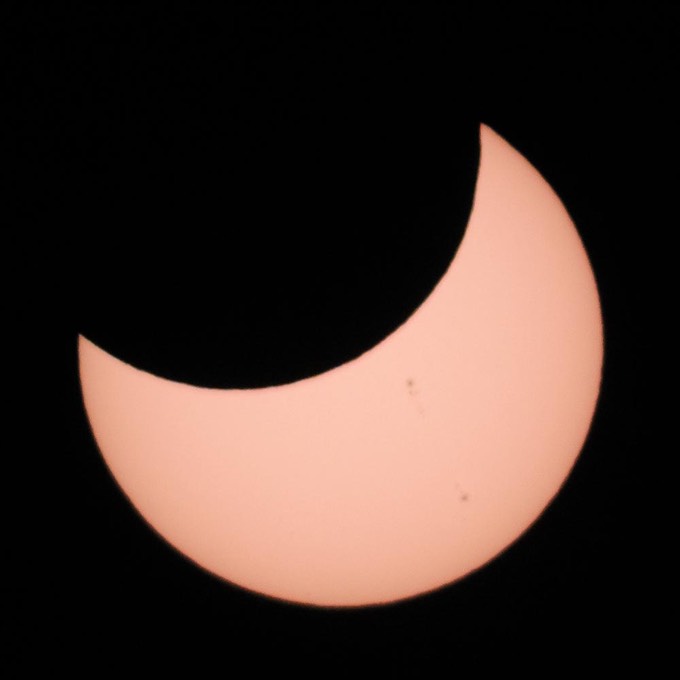
This was about as good focus as I could get. Notice the sun-spots!
What did I learn?
1. For the V1, at least, filters are really necessary to enable a reasonable image on the LCD that can be focussed on.
2. Need to find a more stable platform for a 1000mm (equiv) lens
3. Use electronic shutter to minimize motion blur
4. Experiment with shutter/aperture/IOS to minimize noise and motion blur
5. Figure out how to disable the EVF
6. Figure out how to adjust the LCD to get a better picture at different exposure levels
7. Wear sun-block
Photographing the Transit of Venus (June 5, 2012)
As luck would have it, another celestial event occured on June 6 - the Transit of Venus. This is a once-in-a-lifetime event where Venus and the Sun are aligned and Venus is between the Earth and the Sun. It's not as spectacular as an eclipse but it's a spooky effect that is worth recording. And, In Northern California, you could view the transit from it's entry point at 3:06pm local time until the sun set at 8:02pm.
I was able to purchase some solar film and made a filter that could plug into the 70-200mm or my 300mm lens. The filter was modified from the styrofoam base of one of my nikon lens cases. The film is called AstrSolar (Baader), see www.astro-solar.com.
With this filter in hand, I did a few tests directly into the sun with both lenses. I quickly concluded the following:
1. Use the 300mm f/2.8 VRII lens for extra reach
2. Use AF to focus by positioning the focus area of the camera across the (high contrast) boundary between the sun and space. It turned out that the camera did a much better job at focussing than I could with the hoodloop.
Here was the set-up.
Nikon V1
Lens: 300mm f/2.8 VRII + 2X teleconverter. This gives a 600mm FX equivalent, or 1620mm for the V1
Gitzo tripod, RRS ballhead and Wimberly side-mount. This gave a more secure mount than before
AstoSolar filter
Approx. 1/500 sec, f/8, ISO 100. This was reduced to 1/300sec, f/6.3, ISO 400 as the sun set. Electronic shutter
Lens set-up AF, no VR.
I took shots at approx. every 30min for the duration. Towards the end some clouds came in and obscured the final moments but otherwise a success. Here are a couple of shots from the sequence:


The actual shots were quite grey. I colorized these in Photoshop.