Update. February 19, 2017
Since first looking at camera/lens calibration back in 2013, the need for accurate calibration has only increased. My interest in portrait photyography has led me to use more “fast” prime lenses. Right now, I have the following lenses in this category:
Nikkor 24mm f/1.8G
Sigma 35mm f/1.4DG
Sigma 50mm f/1.4DG
Nikkor 105mm f/1.4ED.
If you want to get pin-point focus (on the eye) at full wide aperture, using AF, the lens/camera combination needs to be bang-on in terms of focus accuracy.
For example, the 105mm f/1.4 lens at MFD (1m) has a DOF of just over 6mm. And, that’s using the traditional measure of DOF. Modern, high resolution cameras, like the D810, will show focus degradation at even narrower DOF’s when viewed at 100%.
Measurement and calibration software has improved also. My Preferred solution is the Michael Tapes Design FocusTune software (currently in Ver. 4). It’s over-priced, the alignment target is flimsy, the alignment process is tedious, but, if you set it up correctly, you can get consistent results.
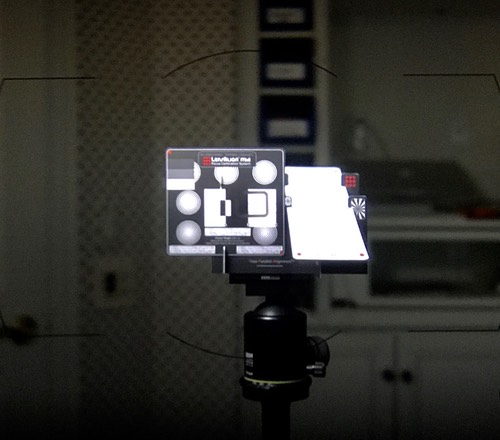
So, I decided to recalibrate my camera/lens combinations and to do it properly and consistently. Since most of these lenses were relatively short focal lengths, I deciced to do the tests indoors under controlled lighting.

I illuminated the target with two LED lights, one (on the right) pointing downwards on the ruler. The other (left) was pointed at the focus target and also used to illuminate the alignment holes on the back of the target. I set the color temperature to 5000K. This arrangement gave an illumination of approx. 9EV.
Here’s how to set up.
1. Attach the target on to a stable tripod, set to a convenient height. Use a spirit level to make sure the target is perfectly level in both the X & Y directions. Measure the height from the floor to the center line of the target (H).
2. Set the camera on another tripod at a distance approximately equal to 25X FL of the lens being tested (measured between tripod centers). Adjust the camera height so that the middle of the lens is exactly the same height as the target center line(H). make sure the camera is pointed directly at the target and that it is also set level in X & Y.
3. Look through the rear target hole ( with the focussing template removed) and adjust the position of the target so that you see the camera lens centered in the hole. This will give an approximate alignment.
4. Now, illuminate the target and set the camera to Live View. Magnify the LV screen until you see the red/black dot on the screen (i place a small piece of tape on the back of the target to cover the hole. This helps to clarify the visualization of the hole. At this stage, use a narrower aperture than wide open to make sure the target hole is in focus (or use manual focus).

Use the template above to align the camera and the target.
Use the Main Target for alignment:
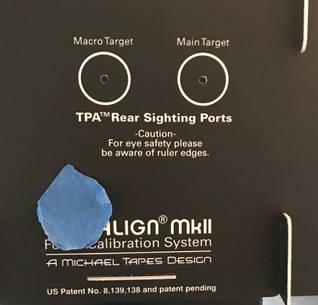
Make sure the focus target is right in front of the Main Target (“B”) - not sure this is strictly necessary so long as the camera can focus on a high contrast segment of the target.
Camera Settings:
- Image Quality - Jpeg Fine
- White Balance - 5000K
- Picture style Standard
- Color Space Adobe RGB
- AF Activation Shutter/AF-On (a4)
- AF-s, Single point (centered)
- Single shot (not continuous)
- Mup
- Exposure set to manual, aperture wide open. Measure with incident light meter. Check exposure for “blinkies"'
- All stabilization systems OFF (Canon IS, Nikon VR, etc)
- All distortion correction, Vignette, NR, active D-lighting, HDR, etc. set to off
- ISO 100 or minimum default
- Use cable release or remote release
- AFA settings (AF MicroAdjust or AF Fine-Tune) should be made to the "per lens" or "saved value" setting, not the "default" or "all lenses” setting
- Once aligned, close viewfinder eyepiece
- Defocus between shots (slightly) towards infinity.
Example.
D810 w/ Sigma 35mm f/1.4DG HSM.
This is a good combination to get calibrated accurately, especially for close-up portraits. The test distance was set at 25X focal length or approx. 3ft
I recently had my D810 recalibrated by Nikon because it had been consistently been back-focussing all my lenses. Interestingly, this particular lens required no AF fine tune before the camera was recalibrated. After recalibration, it exhibited severe front focussing:

This would require approx +17 correction in camera to correct for this front focus. Instead, I decided to use the SIGMA Optimization Pro software with the attached USB lens carrier to make a correction. I set the correction to +10 across all distances as shown below.

Upon retesting with Focus Tune I got the following result.

By happy accident, I managed to dial in the correct compensation so that there was no further AF fine tune (+/-) required in the camera.
In order to verify this visually, I used the FastRawViewer software. I took a series of shots, this time in RAW, and displayed them in FRV. There is an option to view fine details (View -> Focus Peaking -> Fine Details). This confirmed that the alignment was pretty-well spot on.

I then wanted to see what variations I might see based on distance from the target. I moved the camera to approx 1.5 -2ft from the taget and got the folloing result.

Pretty close.
At approx. 8ft from the target I got the following.

Some front focussing but within the DOF range of the lens.
I then wanted to see what variations there would be with aperture (focus shift)
F/2.8

F/5.6

F/11

Arguably some back focus shift but well within the DOF range.
So, from a measurement POV, everything looks pretty good. I could further optimize by adjusting the compensation in the SIGMA software, by distance, to eliminate any focus differences based on distance but it hardly seems worth it. I will now test on a real subject.
Tested close range AF accuracy on one of Carol’s dolls and was able to get good focus accuracy, comparable to manual focus using LiveView. I also tested the 105mm f/1.4 AF at different focus points and achieved consistent results. As can be seen from the FocusTune data, there can be considerable AF variation when focussing on a single, static subject. PDAF is not perfect. Generally this variation is within +/- 5points on the Focus Tune scale but can be noticeable on the target as well as result in subtle defocus artifacts on real subjects. As a result, it looks like good practice to take multiple shots when focus accuracy is critical, just to make sure you get one that is “spot-on”.
Here’s the results of what I have tested so far (Feb 25, 2017)

Archive.
Camera Settings Best Practices - Nov 28, 2013
- Use Aperture Priority Exposure - OK if lighting varies slightly
- If lighting is constant artificial source, use manual exposure
- Set Picture Style to Neutral (not Standard, Vivid, Landscape, etc.)
- Large-Fine Camera-shot JPEG images (not RAW conversions)
- Single Center point AF (not Spot AF on Canon)
- Single shot (not continuous)
- Fixed White Balance (not Auto)
- Shoot Wide open (in some cases it is best to shoot 1/3 to 1 stop down, especially with lenses 1.8 or faster)
- All stabilization systems OFF (Canon IS, Nikon VR, etc)
- Shake avoidance techniques
- AFA settings (AF MicroAdjust or AF Fine-Tune) should be made to the "per lens" or "saved value" setting, not the "default" or "all lenses" setting
- de-focus between shots slightly, in the same direction (towards "closer", not infinity....do not de-focus to extremes)
- Do not shoot in Live View mode
- Do not use rear AF button on Canon cameras (Canon bug). You can use a cable release.
- Use highest exposure without causing the ruler or target to clip (watch the blinkies on the rear LCD to determine exposure)
- ISO up to 1600 if needed (better to use ISO 1600 than to risk camera shake with lower shutter speed)
- DX Crop mode on Nikon (just to keep file size down)
- Align LensAlign to Camera using True Parallel Alignment
- Viewfinder eyepiece closed
- Shutter Delay Mode (Nikon)
- Self-Timer (Canon)
- Cable release
Suggestion: before taking an extended set of test files, take 6 quick shot at 3 different AFAs (2 each) and bring them into FocusTune to check that your settings are correct. You do not want to shoot an entire test series and find out that you had something set wrong.
Michael
-------------------
Click for FocusTune User Guide, Downloads, and Resources
Click to Upload Files to Michael Tapes Design
Please sign all posts with your real name. Thanks.
Site Admin
Posts: 936
Joined: Tue Aug 14, 2012 4:15 am