Panoramas are fun and can yield spectacular results, especially for landscapes. This section explores various techniques for creating panoramas, from the “precision” methods to handheld. In fact, there are three basic methods:
1. Tripod mounted camera with a panorama attachment
2. Tripod mounted camera with a tilt/shift lens
3. Handheld camera.
References:
http://www.tawbaware.com/maxlyons/
http://www.stereoscopy.com/jasper/panorama.html
Since I started with #2, I’ll report on this first.
Panoramas with a title/shift lens.
This method is the easiest to use but probably the most expensive. Tit/shift lenses, used in the shift mode, can be used to take a number of photos at various overlaps (typically 3), precisely aligned. You can then use panorama software (merge to Panorama in Photoshop) to stich the images together. The equipment I use is:
Nikon D800E, Nikkor 24mm f/3.5D PC-E. The lens is capable of shifting +/- 11.5mm. This results in being able to take three shots - one at extreme left, one at center, one at extreme right, and combine them into a single panorama with an aspect ratio of approx 2.5:1 in landscape mode.
Image resoultion of a single image : 7,360 X 4,912
Image resolution of final panorama : approx. 12,100 X 4,921 (varies depending on alignment)
Image resoultion of final panorama after modest cropping out artifacts : approx. 11,970 X 4,787
This resoultion would yield an image that is 40 inches by 16 inches at 300dpi (1000mm X 400mm)
At 310dpi (native resolution of the Epson 3880), the image size would be 38.6inches X 15.4inches (980mm X 391mm)
Note that Colin Prior (the master of panoramas) generally prints at 3:1 - 900mm X 300mm. Thus the D800E panorama would easily print this size at the maximum resolution of the printer. Red River Paper makes panorama paper at 13" X 38" (330mm X 965mm)
Further note: 900mm X 300mm is 35.43inches X 11.81inches. At 310dpi, this requires a resolution of 10,983 X 3,661
Procedure.
1. Pick the subject and mount the camera on a sturdy tripod. Level the head so the camera is completely level in both axes.
2. Find the optimum exposure and set this in the camera, manual metering mode. Diggloyd recommends f/8 for best corner sharpness and minimize vignetting.
3. (optionally) set the white balance to something other than automatic. I only would do this for scenes where color balance may shift across the scene.
4. Set image type to RAW + Jpeg (Jpeg is useful for testing out the panoramas w/o taking up too much storage)
5. Remove lens hood since this can cause vignetting
6. Set focus mode to manual and optimize focus. I use Live View for this, preferrable with a magnifier.
7. Take 3 shots - center, left, right. You can rack the adjustment to the limit (+- 11.5mm) but will see significant vignetting on the left & right images. This is hard to remove since it’s assymetric. it can be cropped out in post. Recommended that you only go +- 8.5mm if you don’t want to crop.

Center

Left

Right
Note: Diggloyd suggests that for objects at short distance, eliminate parallax by mounting camera on a slider and offsetting the camera by the amount of shift so that the (shifted) lens stays on the center line.
8. For optimum sharpness, do the following:
(i) focus with (magnified) LiveView on center image. I’ve noticed that center focus remains good on shifted images but worth checking)
(ii) Use a remote shutter release, (no need for M-up if using Live View. If not, use M-up)
(iii) Use an aperture of f/8 or smaller to preserve edge/corner resolution and minimize chromatic aberration.
9. Import into Lightroom, do the following:
(i) Pick the center image and make necessary adjustments (exposure, wb, etc.)
(ii) In lens corrections, correct for Chromatic abberation (mostly noticeable on the outer edges of the left and right images). Lightroom does not support the profile of the PC-E lens so no geometry correction can be made. (not generally needed)
(iii) Sharpen (I use Diggloyd std. 60 .7 20)
(iv) Copy and paste develop settings on to the left and right images.
10. Pick all three images. Go to “Photo”->”Edit in”->”Merge to panorama on Photoshop”
11. After the panorama is created, check everything is OK, flatten image layers (important to save space, the panorama can easily be >1GB) and save. Panorama will be imported back into Lightroom.
Note: In Photoshop crop, If desired, the image to a desired aspect ratio and/or resoution. otherwise this can be done in Lightroom

Full shift, notice the vignetting

Less shift (~+-8.5mm), notice less vignetting
Tripod mounted camera with a panorama attachment.
For this, I use the following equipment, shown with D800E and Sigma 35mm f/1.2 lens:

Nikon D800E with RRS BD800-L Plate
RRS PCL-1 Panning Clamp mounted on a RRS Ball-head
RRS MPR-CL II Nodal slide
This is good, heavy duty equipment.
I measured the nodal points for the following lenses:
Nikon 24mm f/3.5 PC-E 137mm
Zeiss 24mm f/2 93mm
Sigma 35mm f/1.4 106mm
Others to follow.
Update February 7, 2018.
Plenty has happened since I wrote the article above:
The latest Nikon DSLR is the D850 with 45.7Mpixel resolution (8256 X 5504)
The latest SONY mirrorless camera is the A&R III with 42Mpixel resolution (same as the A7R II)
New adapters for SONY to allow for the uses of Nikon lenses (Commlite Pro, Fotodiox Pro) - see SONY A7R III for a discussion on adapters
Tilt/ shift adapter from Laowa which allows Nikon lenses to be attached to the SONY camera and to have tilt/shift functionality
Venus Optics Laowa Magic Shift Converter:

The adapter has a 1.4X magnification and a 1-stop slower aperture than the native lens. I’d like to dig a bit deeper on this adapter since it creates a whole new area of flexibility for the A7R III, but first, a brief recap on panorama techniques.
1. Tilt/shift lenses (or adapters) can give satisfactory results for panoramas in the 2 - 2.5 aspect ratio. They are the easiest to stich and give the best geometric alignment with minimal distortion. On the other hand they suffer from softness and vignetting at the edges which is difficult to avoid and requires de-fringing in Lightroom / Photoshop to even partially correct. Recommended apertures to minimize these effects are f/8 - f/11.
2. Using a proper panning mount and aligning the nodal point yields the best quality panoramas in terms of sharpness across the image and flexibility in resulting panorama size and aspect ratio. Depending on the subject, they are more challenging to stitch together and sometimes (generally) result in some geometric distortion. In many cases this distortion can be (partially) corrected in Photoshop using the lens correction tool. Using high quality prime lenses yields the best results. Also, longer focal length lenses generally result in less distorion. One of my favorites, with the D850, is the Sigma 50mm f/1.4 Art lens.
3. Becaue the new Commlite adapter works with the Nikon 24mm f/3.5 PC-E lens, I can use it interchangeably between the D850 and the A7R III. I have not noticed any significant difference in quality between the two cameras - very sharp in the center but each having the same edge softness / vignetting challenges. The SONY used to have the added benefit of manual focus peaking but this is now available in live view on the D850. Technically, the SONY also has IBIS but this is unnecessary because of using a tripod (a must) and should therefor be disabled.
4. The increased resolution of these new cameras gives the opportunity for even larger prints. For example, a typical T/S panorama with the D850 is approx. 13500 X 5500 (nearly 75Mpixels equiv). at 300dpi, this yields a print of approx. 45” X 18”.
Now for the Laowa Magic Shift Converter.
This device allows you to use (almost) any Nikon lens (including G-type) and simultaneously convert to SONY mount and to a titl/shift lens. It is an optical converter with 1.4X magniiciation and the loss of 1-stop. This results in fewer edge issues (softness, vignetting) without loss of overall quality. It has a maximum shift of +/- 10mm. The lens can be rotated to work both vertically and horizontally. The primary function of this adapter is for perspective correction but my main interest is as a panorama device.
Not shown in the picture above, on the Nikon version, there is an adjustable aperture ring graduated from “F” to 8. This is used to set the aperture on Nikon lenses which don’t have an aperture ring (G-type). I tested a number of Nikon lenses and they generally responded to rotating the ring. The exception was the Nikon 24mm f/1.8G which did not seem to work. Who knows. My target lens on this adapter was the Sigma 35mm f/1.4 ART lens. On the adapter, it becomes a 50mm equivalent with an f/2 minimum aperture (theoretically). Tests using this lens yielded good results with excellent center resolution, virtually no vignetting and, while still visible, quite well controlled edge softness, particularly at f/11 (equiv). I decided to find out, for this lens, what the adapter gradations corresponded to in terms of f-stops. Here’s what I measured:
F f/2
2 f/2.8
3 f/3.5
4 f/5
5 f/7.1
6 f/11
7 f/16
8 (f/22) couldn’t set this in the Sigma lens
These numbers are approximate and your mileage may vary. I’m sure they will also be different for different lenses.
I think this is a very handy device and allows the A7R III to have great fexibility in Tilt/shift given the wide range of Nikon lenses that work with it. I’m sure I’ll experiment more.
Update Oct 13, 2019.
Lens compatibilty:
IRIX 15mm f/2.4 - No aperture control, wide open
Sigma 14mm f/1.8 - No aperture control, wide open
Nikon 24mm f/1.8 - No aperture control, wide open
Sigma 35mm f/1.4 - Full aperture control
Sigma 50mm f/1.4 - No aperture control, wide open only
Nikon 14 - 24mm f/2.8 - Full aperture control
I will try some experiments with the Nikon 14 - 24mm, could be good for panoramas.
Nikon Z7 Panoramas.
Link to table of nodal points (not the same pano set-up but close)
https://www.dpreview.com/forums/thread/4406749
My own measurements:
Here is the setup I used. Make sure to position the camera correcly (lens axis aligned with the center of rotation of the tripod, everything properly levelled). With an L-bracket on the camera it can be positioned for portrait or landscape modes.

The image below shows the position of the nodal slider, adjusted to remove parallax:
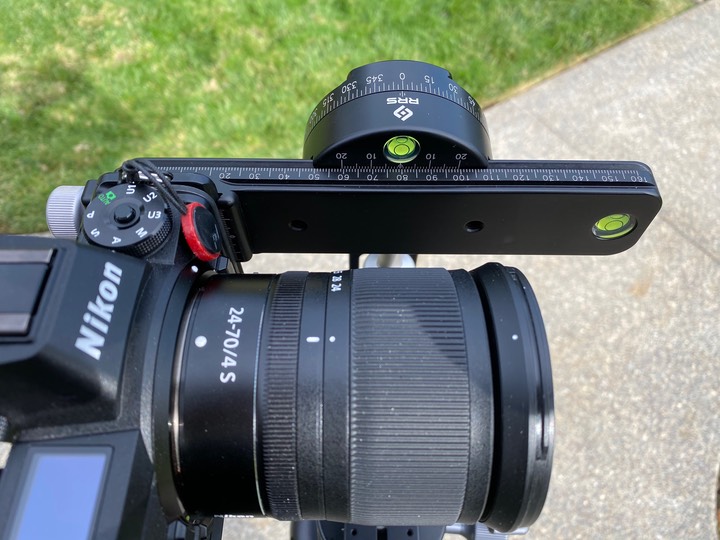
I put a light stand approx. 5ft from the camera and then aligned it with a target approx 50ft away. I aligned by setting the rotation to zero then moving the tripod from side to side until the targets align in the center of the frame. I adjusted the focus point so I could zoom in to see how the alignment changed with rotation angle. I then adjusted the slider so the two targets remained aligned as I swept the camera arond. Will test with a variety of lenses.
Best technique is to align the targets with the camera central (focus point at center). Then rotate the camera until the targets are at the left edge. Move the focus point to the targets and zoom in. Move the slider until the near and far targets align exactly. Test on the other extreme and back to the center. The slider position should be recorded.
All lenses Z-mount. Aperture settings at f/8 for all lenses
85mm lens. Slider position - 51mm
50mm lens - 75mm
35mm - 81mm
24-70mm f/2.8, @70mm - 89mm
24-70mm f/2.8, @24mm - 112mm
24-70mm f/4, @70mm - 80mm
24-70mm f/4, @24mm - 96mm
Base slider positions:
Portrait #7.7
Landscape #6.8
Tutorial on distortion correction:
https://fstoppers.com/education/quick-fix-correcting-distortion-stitched-panoramas-190686
https://www.youtube.com/watch?v=QZFfJgRVqrE